Logos is one of the most advanced digital Bible study suites available, offers loads of free and paid content, and is available for PC, Mac, Android and iOS. The missing option to read Logos resources on an e-ink device has been a big gap. This article explains how to get Logos working on the Tolino Shine, an Android powered back-light e-ink reader.
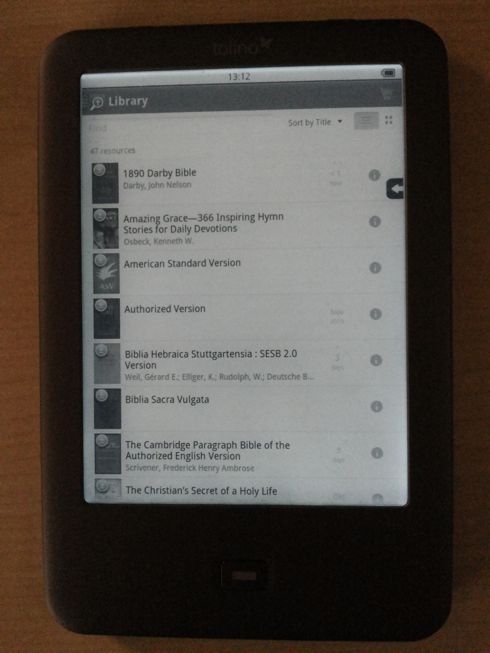
What's a Tolino and where can I get one?
Tolino Shine is an eBook reader for the European market distributed by the German Telecom, the parent company of T-Mobile. Manufactured by Onyx Intl. with the model id "Imx50_rdp", it runs Android 2.3.4 Gingerbread. In its native configuration, it can only run the Tolino app. The user is not allowed to install any other apps. However, rooting the device is an easy process, and enables the user to install their own apps including Logos or Vyrso through the Google Play store. Tolino has a 6" back-light e-ink touch screen (similar to the Kindle Paperwhite, but a bit lighter). The native Tolino app can currently be used to purchase books in Germany, Austria, Switzerland and Belgium, with more European countries likely to follow. But does that restriction matter when you use the device to run Logos?
Since Telecom distributes the device in Europe only, the easiest way to obtain a device overseas is purchasing via Amazon.de or eBay.de. If you already have an account on any other Amazon or eBay site, you can log into the German sites as well, and use your existing delivery and payment options.
For the root process to work, Tolino's firmware version must be lower than 1.2.0. You will only be able to complete the process on firmware versions 1.0.x and 1.1.x. Tolino will be useless for you if it has received any software update after October 2013.
(There is a last emergency option to root Tolino on higher software versions when you open the device. Since I've not tried this process, I'm not able to go into details here.)
When it comes to international customers, German sellers are often scared about two issues:
- high shipping cost.
- possible fraud.
Therefore, they will usually not offer international dispatch. If you contact them, you can ask them to allow international purchase. You can point them to this article to convince them that you're a genuine customer. When it comes to shipping, the best option is standard mail (EUR 3.45), registered mail (EUR 5.60) or insured mail (EUR 7.60). The Tolino, even in full packaging, does fit the permitted weight and dimensions for mail. Sending by parcel is not necessary, and would indeed be a waste of money. Don't forget to confirm the Tolino's software version with the seller. No need to worry about warranty, as rooting will void the warranty anyhow.
How to get root access to Tolino?
Now that you have a Tolino before you, please note the most important piece of information first. Do not trigger the automatic software update if you get prompted to do so. The best option would be not to connect Tolino to Wifi yet. The device's language is still set to German or Dutch by default. You can ignore the setting for now. Changing the language is possible after the root.
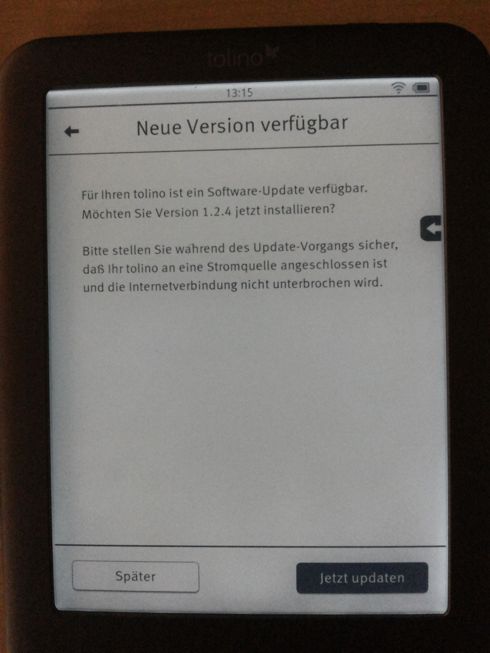
When Tolino prompts you to update the firmware, pressing Später will cancel the
update, and Jetzt updaten execute the update (which you do not want). The wording for
the Belgian version will be different. After the root, updates provided by Telecom are supposed to
be rejected. (I've not tried this though, as in case it updates anyway, that'd mean losing root access.)
Tolino has three buttons:
- sleep slider button (upper left) - hold it for several seconds to restart the device.
- back light button (upper right).
- home button below the screen.
In order to complete the root process, you will need to have a
microSD card
(preferably large enough to fit your entire Logos library), access to a Windows PC, the Tolino root package from
ALLESebook.de
("ALLESebook.de Root-Paket 1.0"),
the recovery image recovery.img.fixed_initrd_and_testkey and the update package
update_hugendubel_1_2_4_reworked_testkey.zip from
hecke,
who has made the root available in the first place, and the update package
update_1.5.3_mod_signed.zip by frank-w of
lesen.net,
which you can download from
here.
The following steps have been taken from ALLESebook.de and slightly
adapted to incorporate the firmware updates to version 1.2.4 and 1.5.3 respectively.
1. Download the root package and extract the contents to your hard disk.
2. Insert the memory card into Tolino, and connect the device to your PC using the USB cable.
3. Rename the file recovery.img.fixed_initrd_and_testkey to recovery.img
and copy it onto the memory card using the Windows explorer. This file is going to enable ADB on
the device, disallow Telecom signed software updates, and add the keys to allow installation of
update packages signed by hecke.
4. Disconnect Tolino from your PC.
5. Restart Tolino holding the sleep button for some seconds, then press Neu starten on the screen. The
device will then copy the modified recovery image to its internal storage. This will take about 5 minutes, and is
not a visible process on the screen. Once complete, Tolino will shut down automatically. After restarting, you can
verify the successful process by connecting the device, and checking the contents of the memory card. It should
contain the file recovery_img.old with the previous original image. If you want you can save that file
elsewhere to reset Tolino back to factory settings if ever necessary. In case the process was not successful, you
can try another manual restart.
6. All data stored on the device will be deleted at this point. To execute recovery, shut Tolino down, and while holding down the home button, push the sleep button to start the system options menu, then select recovery from the options. The recover script will do its thing, automatically restart the device afterwards, and bring you back to the home screen.
7. Now you can update Tolino to version 1.2.4. Rename the file
update_hugendubel_1_2_4_reworked_testkey.zip to update.zip, copy it to the memory card,
and restart the device. The update script will run automatically, and restart the device afterwards. To clean
things up, you can trigger another recovery by repeating step 6.
8. Repeat the previous step with the new update package. Rename the file update_1.5.3_mod_signed.zip
to update.zip, copy it to the memory card, and restart the device. The update script will run
automatically, and restart the device afterwards. Don't trigger another recovery now, or you'll go back to
version 1.2.4.
9. The device is now enabled for ADB, but does not yet have root. Next step is to install the Windows ADB driver.
Execute batch file 2_vendor_id.bat from the root package.
10. Now connect Tolino to the PC again. Open the device manager in the control panel. If it looks any different than in the following screen shot, you can start all over from step 3 again.
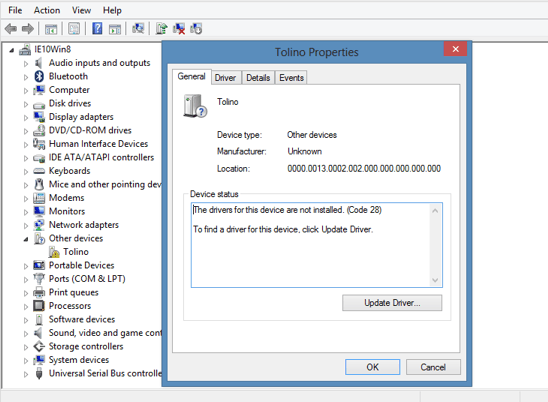
11. As you notice, Tolino is showing with an exclamation mark. This is normal behaviour, as the ADB driver hasn't
been installed yet. Automatic driver detection is not possible, even if you select the Google ADB driver manually.
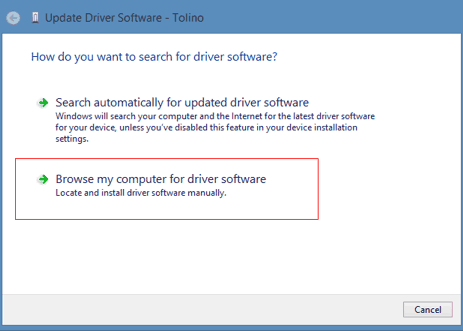
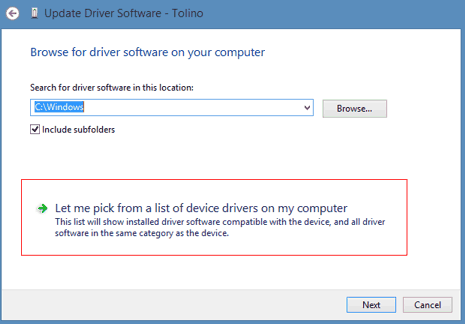
So please go through the following instructions very carefully to force Windows to install the driver. Double click
the device to open it's properties, then click the Update Driver... button. Then select
Browse my computer for driver software.
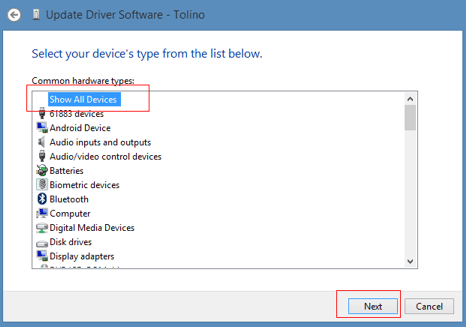
12. Now select Let me pick from a list of device drivers on my computer, and select
All Devices.
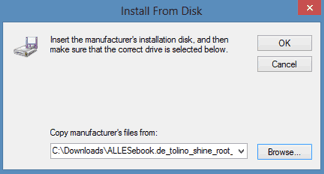
13. Now click the button Have Disk..., and afterwards browse to the folder to which you've downloaded
the Google ADB driver (which is part of the root package). Then select the file android_winusb.inf.
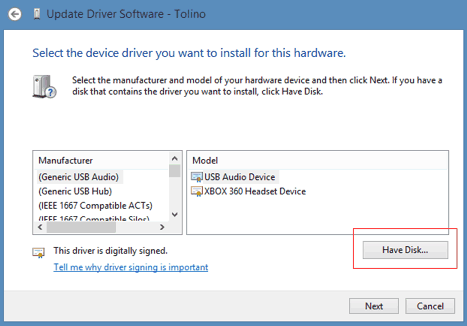
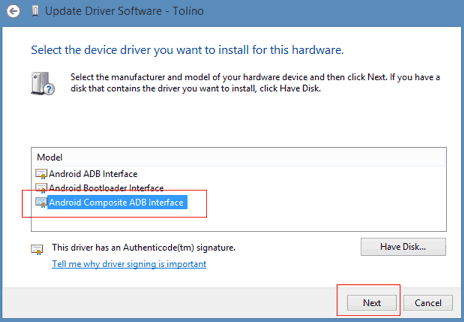
14. Select the Android Composite ADB Interface, and confirm. Now Windows will issue a number of
warnings, that the driver would not be suitable for the device. You can ignore all of the warnings, and go
ahead with installation. The actual driver installation can take a few minutes. Be patient and wait. After
successful installation, the exclamation mark on the device manager will disappear.
15. New applications and root can now be installed via ADB. To upload a basic set of apps and functions, as well as
the root superuser, open a command prompt and enter the following lines from the folder 3_adb of the
root package. The batch file 3_install_su.bat will not work, as ADB has no superuser permission by
default after the upgrade to version 1.2.4, so the ADB commands must be keyed in manually. The following apps will
be installed as part of the package:
- LauncherPro
- Gallery App
- Google Play
- Button Savior
- Cool Reader
- Total Commander
- Superuser
And here are the commands to enable root and install the basic set of apps:
adb kill-server
adb wait-for-device
adb push busybox /data/local/busybox
adb push su /data/local/su
adb push Superuser.apk /data/local/Superuser.apk
adb push z_Vending.apk /data/local/Vending.apk
adb shell
su
mount -o rw,remount /dev/block/mmcblk0p2 /system
chmod 777 /data/local/busybox
chmod 755 /data/local/su
chmod 755 /data/local/Superuser.apk
cat /data/local/busybox > /system/xbin/busybox
chmod 777 /system/xbin/busybox
/system/xbin/busybox --install -s /system/xbin
busybox cp /data/local/Superuser.apk /system/app/Superuser.apk
busybox cp /data/local/su /system/xbin/su
busybox cp /data/local/Vending.apk /system/app/Vending.apk
rm /system/bin/su
ln -s /system/xbin/su /system/bin/su
chmod 6755 /system/xbin/su
chmod 644 /system/app/Superuser.apk
chmod 644 /system/app/Vending.apk
exit
exit
adb install z_GoogleServicesFramework.apk
adb install z_LauncherPro-0.8.6.apk
adb install z_Gallery3DFroyo.apk
adb install z_cr3.0.55-19.apk
adb install z_SWkey36.apk
adb install z_tcandroid202.apk
adb shell
su
rm /data/local/su
rm /data/local/Superuser.apk
rm /data/local/Vending.apk
reboot
16. Tolino will reboot automatically. You can now disconnect the device from your computer. When the boot process is complete, you will be asked to execute the Tolino or the LauncherPro surface. You can either make a one time selection so that the selection screen will re-appear next time, or default Tolino to LauncherPro in case you don't need the Tolino surface. Do not default the device to the Tolino surface, as you won't be able to access the Android settings or other Android apps from there, so the new Android interface will be out of reach, and can only be accessed again when you remove the default settings with ADB.
Since Tolino is lacking most of the standard Android buttons, you'll have to use the Button Saviour buttons on the touch screen to access most of the functions. There's an update on Button Savior available on the Play Store which will improve stability considerably. In the Button Savior settings, you can move the position of the buttons, and change their appearance to a high contrast theme suitable for e-ink display.
17. That was already it. Your device is rooted now. You can use Total Commander or the Play Store to install more apps. The internal storage is about 400 MBytes, plus an additional 2 GBytes on the internal memory card. The external memory card can't store any apps, but you can put additional resources (epub, mobi etc.) to use with the Cool Reader on it. For Logos, you still have the 2 GBytes on the internal memory card, but you can move it to the external memory card, for which there is a separate set of instructions.
Tolino of Babel - How can I make the device speak my language?
On a rooted device, this is an easy task, and is the next logical step after completing root. Both the Android surface and the Tolino app support localisation. Let's do the configuration on Android first. The Android launcher supports a large number of European and Asian languages.
On the Android start screen, open the screen with the apps, there select the settings app
(Einstellungen in the German version). In there, go to Sprache & Tastatur, then
Sprache auswählen, and there you have the full list of supported languages.
These include: Bulgarian, Catalan, Chinese (simpl.), Chinese (trad.), Croatian, Czech, Danish, Dutch, English (UK), English (US), Finnish, French, German, Greek, Hebrew, Hungarian, Indonesian, Italian, Japanese, Korean, Latvian, Lithuanian, Norwegian, Polish, Portuguese (BR), Portuguese (PT), Romanian, Romansh (Switzerland), Russian, Serbian (cyrillic), Slovak, Slovenian, Spanish (ES), Spanish (US), Swedish, Tagalog, Turkish, Ukrainian, Vietnamese.
Once you've selected your language, the Play Store and all other apps that support localisation will display in your language.
Now let's change the language of the Tolino app. It only supports two languages, depending on the country version,
German and English, or Dutch and English. In the German version, go to Einstellungen, then
Sprache. You'll be able to change the language there. Having changed the language in both locations
the device is now configured no to display any more German or Dutch any longer at all.
How to update the software without losing root?
Software and firmware updates are an important step to keep up with security, especially if you go online with your device. With your Tolino, if you just accept the automatic software update that's offered to you, you will lose root access. Installation of Telecom provided updates should be disabled on a rooted device, but I've not tested that.
The new firmware 1.6.2 hs been released since March 2015, however, no-one has bothered to update the root package so far. In case this will be done at some point, I will update this post.
How to move the Logos app to the external memory card and download all resources?
Tolino supports App2SD by standard. However, it already has an internal 2 GB memory card installed. If your Logos library doesn't exceed 2 GB, you can easily use that card to move the Logos app to. My own library however is 10 GB in size, so I've researched a way to move it to the external memory card instead.
All the App2SD apps offered in the Play Store support moving apps to the first memory card only, so they're of no use to get this step done. You will need the DirectoryBind app instead. Please download the latest version from the XDA developers website. You can install it with Total Commander or ADB.
The Directory Bind Tool will allow you to bind a folder on the external memory card to a folder on the internal memory card. The folder on the internal card, no surprise, is the Logos resources folder, which you bind to the external memory card. The result is availability of the entire space on the external card for your library.
As a preparation for the procedure, please use the Android settings to move Logos to the (internal) memory card.
Please also create a single folder (for example com.logos.androidlogos) on the external memory card
(by plugging the Tolino into a Windows PC for example). Then unplug the device, force the Logos app to stop via
Android settings, start the Directory Bind app, and create a new entry.
As source folder, enter /sdcard/extsd/com.logos.androidlogos/, and as target folder enter
/sdcard/Android/data/com.logos.androidlogos/. Don't be confused. Target is not the target of the
app moving, but the target of the folder binding. Tick the box to transfer all files to the source folder,
then create the new record.
Successful folder binding is indicated by the colour of the icon next to the record. Green icon means success... But wait, on the Tolino black and white screen, the coloured icons are massively helpful to verify that the folder is bound... So better go to Total Commander, and verify manually that both source and target folder contain your library files. If not, that's usually the case when you forget to force Logos to stop before executing the binding. If that happens, just force stop, go back to Directory Bind, unbind the record, and enable it again.
Folder binding gets lost whenever you plug Tolino into a PC (both for charging and for accessing the drives), remove the memory card, or reboot the device. Charging Tolino using a power adapter will not trigger a reset of the folder bindings. Make sure you restore the binding before starting Logos, or else you'd create a second library folder on the internal memory card, and mess up the entire application. To enable easy restoration in case this happens, I suggest installing a backup software such as Titanium Backup.
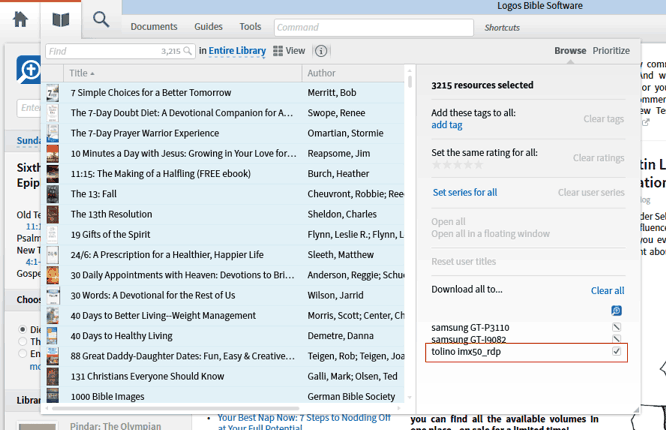
Anyway, once the folder is bound, and you start the Logos app, resources will be installed on the external memory card. What's needed now is an easy way to copy your entire library to the app in one single go. You can't trigger this process on the Tolino, but you can do it on Logos for PC. Open the PC application, then go to your library. There you select all the books, and tick the box "tolino imx50_rdp" under mobile devices. You will then need to restart the Logos app (forced stop) to receive the resources on Tolino.
Just a few resources can't be copied over like that. If it's important to you to get everything, you can now go through the library manually, and download the books that are still missing. For me, with more than 3,000 titles, this was only the case for about a dozen items.
Logos support for Android 2.3 has ended
Logos has announced the end of support for all Bible apps for devices running Android 2.x. It's still possible to download the previous app versions on Google Play. It will auto detect which version you need for your device.
But what does it mean for new app functions and new resources? The app itself, of course, is stuck on an old version, but existing features will continue to work of course. Existing resources will also continue to work. The problem is, once resources get updated with features that require a newer version of the app, they will no longer open in reading mode. That process has already started, and that at some point the impact will be quite unpleasant.
So what can we do to continue enjoying our Logos libraries on an e-ink device? Best thing would be a Tolino firmware update to Android 4.x, which is unlikely to happen, but can't be entirely ruled out.
Still another option would be purchasing another device produced by Onyx. There's a variety of devices available, that don't have to receive root to be able to install third party android apps. However, there are two downsides to that approach. Since the Tolino devices are heavily subsidised by the Telecom, they're much lower in price than the original Onyx devices with similar functions. Secondly, the problem of the internal memory card still remains, and can only be resolved by either keeping your installed library below 2 GB, or rooting the device to leverage the external memory card.
Bottom line: With the end of support for Android 2.3, there's no longer a 100% satisfactory solution to carry your full Logos library with you on an affordable e-ink device. It's just a matter of time for that situation to change to the better though, so stay tuned. As soon as there's any news, we'll update this blog.


