Microsoft has released new deployment tools for Office 2013/2016 and Office 365. With these tools we can create offline installers for a range of Microsoft Office products. This article features step-by-step instructions how to create your customized installer.
Do I need the Deployment Tool?
A lot of Office 2013 and 2016 downloads are availabe as direct downloads, either with or without product key. Please check out or articles on Office 2013 and Office 2016 direct download links. If you don't find your required download there, you can proceed with the steps here in this article.
Step 1: Download and Run the Office Deployment Tool
First of all, you need the Microsoft Office Depolyment Tool. The tool exists in two versions for Office 2013 and Office 2016. Both tools are also suitable to create Office 365 installers, based on Office 2013 and Office 2016 respectively. The installation media that the deployment tool downloads are all based on the click & run technology.
The download is a self-extracting application that contains two files, setup.exe and configuration.xml. Extract those files into a folder of your choice.
Step 2: Configure the Office Deployment Tool
Before you start downloading the installation files, you need to modify the configuration file. Instead of the file that ships with the download, you can use our version of configuration.xml, that is preconfigured for Office Professional Plus 32 bit (suitable for both 2013 and 2016 version). Simply download the configuration file from us, and replace the original one.
If you don't need to modify the configuration file, you can skip straight to step 3. However, you can further modify the configuration to create a tailor made Office installer, either by changing the existing values, or by adding new ones.
Changing the command OfficeClientEdition="32" to 64 creates an installer for the 64 bit
edition.
Changing the command Product ID="ProPlusRetail" to something else creates an installer for a different
edition. For possible values, please refer to the following table.
| Edition | Value |
|---|---|
| Office 2013/2016 Home and Student | HomeStudentRetail |
| Office 2013/2016 Personal | PersonalRetail |
| Office 2013/2016 Home and Business | HomeBusinessRetail |
| Office 2013/2016 Professional | ProfessionalRetail |
| Office 2013/2016 Professional Plus | ProPlusRetail |
| Office 365 Home Premium | O365HomePremRetail |
| Office 365 Small Business Premium | O365SmallBusPremRetail |
| Office 365 Business | O365BusinessRetail |
| Office 365 Professional Plus | O365ProPlusRetail |
| Access 2013/2016 | AccessRetail |
| Excel 2013/2016 | ExcelRetail |
| InfoPath 2013/2016 | InfoPathRetail |
| OneNote 2013/2016 | OneNoteRetail |
| Outlook 2013/2016 | OutlookRetail |
| PowerPoint 2013/2016 | PowerPointRetail |
| Publisher 2013/2016 | PublisherRetail |
| Word 2013/2016 | WordRetail |
| SharePoint Designer 2013 | SPDRetail |
| Project 2013/2016 Standard | ProjectStdRetail |
| Project 2013/2016 Professional | ProjectProRetail |
| Project 2013/2016 Standard volume license | ProjectStdXVolume |
| Project 2013/2016 Professional volume license | ProjectProXVolume |
| Visio 2013/2016 Standard | VisioStdRetail |
| Visio 2013/2016 Professional | VisioProRetail |
| Visio 2013/2016 Standard volume license | VisioStdXVolume |
| Visio 2013/2016 Professional volume license | VisioProXVolume |
| Skype for Business Basic 2015 (Office 2013) | LyncEntryRetail |
| Skype for Business 2015 (Office 2013) | LyncRetail |
| Skype for Business Basic 2016 (Office 2016) | SkypeforBusinessEntryRetail |
| Skype for Business 2016 (Office 2016) | SkypeforBusinessRetail |
Similarly, you can change the language edition by modifying the command Language ID="en-us".
If you require multiple language packs for Office, you can add additional lines and provide one
requred language ID per line. Please refer to the following table for a list of values.
| Language | Value |
|---|---|
| Arabic (Saudi-Arabia) | ar-sa |
| Bulgarian (Bulgaria) | bg-bg |
| Chinese, simplified (PR China) | zh-cn |
| Chinese, traditional (Taiwan) | zh-tw |
| Croatian (Croatia) | hr-hr |
| Czech (Chech Replublic) | cs-cz |
| Danish (Denmakr) | da-dk |
| Dutch (Netherlands) | nl-nl |
| English (USA) | en-us |
| Estonian (Estonia) | et-ee |
| Finnish (Finland) | fi-fi |
| French (France) | fr-fr |
| German (Germany) | de-de |
| Greek (Greece) | el-gr |
| Hebrew (Israel) | he-il |
| Hindi (India) | hi-in |
| Hungarian (Hungary) | hu-hu |
| Indonesian (Indonesia) | id-id |
| Italian (Italy) | it-it |
| Japanese (Japan) | ja-jp |
| Kazakh (Kazakhstan) | kk-kz |
| Korean (Republic of Korea) | ko-kr |
| Latvian (Latvia) | lv-lv |
| Lithuanian (Lithuania) | lt-lt |
| Malay (Malaysia) | ms-my |
| Norwegian, Bokmål (Norway) | nb-no |
| Polish (Poland) | pl-pl |
| Portuguese (Brazil) | pt-br |
| Portuguese (Portugal) | pt-pt |
| Romanian (Romania) | ro-ro |
| Russian (Russian Federation) | ru-ru |
| Serbian, Latin (Serbia / Montenegro) | sr-latn-cs |
| Slovakian (Slovakia) | sk-sk |
| Slovenian (Slovenia) | sl-si |
| Spanish (Spain) | es-es |
| Swedish (Sweden) | sv-se |
| Thai (Thailand) | th-th |
| Turkish (Turkey) | tr-tr |
| Ukrainian (Ukraine) | uk-ua |
| Vietnamese (Vietnam) | vi-vn |
The command Updates Enabled="TRUE" enables automatic updates for Microsoft Office.
If you want to disable updates, you can set the value to FALSE.
The line AcceptEULA="TRUE" suppresses the dialogue that requires the user to accept the Office
license agreement. If you want to enable that dialogue, you can set the value to FALSE.
The line Display Level="Full" enables the UI during installation (progress bar etc.) If you want
to install Office without user interface, please set the value to None.
You can supply a product key in your configuration file and enable automatic activaltion of the product. They key
can be added with the command Product ID="ProPlusRetail" PIDKEY="XXXXX-XXXXX-XXXXX-XXXXX-XXXXX".
Of course you need to replace the XXX with a real product key.
For automatic product activation, please insert the following line right after the line that contains the
Display Level command:
<Property Name="AUTOACTIVATE" Value="1" />
Finally, you can insert commands to exclude Office applications from the installation. Usually,
the Click-to-Run installer adds all applications of the Office suite to your computer.
Modifying the configuration provides a workaround here and gives you full control over the applications that
are installed. Afther the line that contains the Language ID command, you can insert one or more
lines of the following type:
<ExcludeApp ID="Access" />
For a list of possible values, please refer to the following table.
| Application | Value |
|---|---|
| Access | Access |
| Excel | Excel |
| InfoPath | InfoPath |
| OneDrive | OneDrive |
| OneDrive for Business | Groove |
| OneNote | OneNote |
| Outlook | Outlook |
| PowerPoint | PowerPoint |
| Project | Project |
| Publisher | Publisher |
| SharePoint Designer | SharePointDesigner |
| Skype for Business | Lync |
| Visio | Visio |
| Word | Word |
We've covered only the most useful configuration option here. If you need to go more advanced, have a look at the official documentation.
To double check that the configuration file is valid, you can open it in Internet Explorer and verify that the xml has no errors.
Step 3: Download the Office installation files
To download the installation files, you open a command box and navigate to the download folder that contains the setup.exe and the configuration file. Now execute the following command.
setup /download configuration.xml
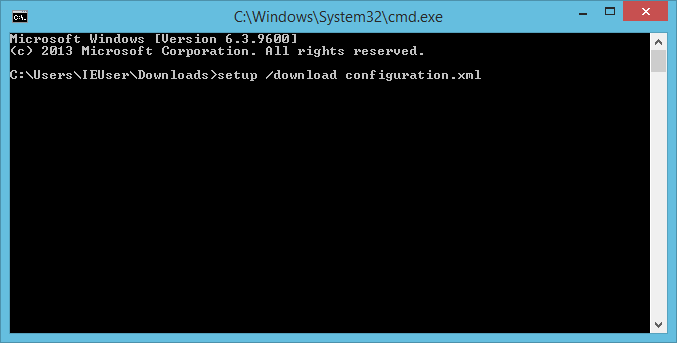
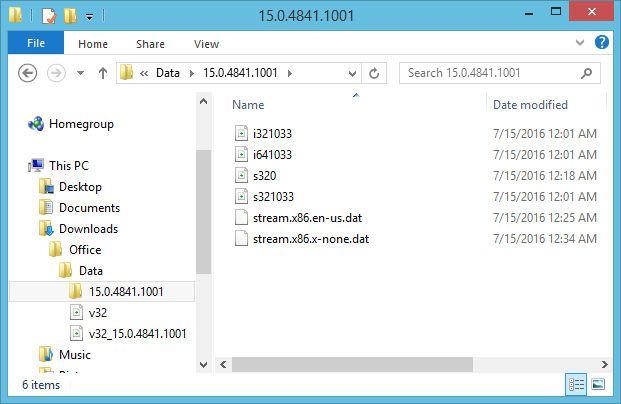
There is no progress indicator. Once all files are downloaded, the process will simply stop. The installation
files are all contained in a subfolder called Office. After the download is complete, the folder
structure should roughly look as follows.
Step 4: Create a Self-Extracting Installer
We now have all required files, and could go ahead install Microsoft Office with the setup.exe from the deployment tool and the modified configuration file.
However, let's create a self-extracting installer first, which can be used for easy storage and backup, as well as deploying the same software to multiple computers. The following steps are all based on WinRAR, but can be done with any archiving software that support self-extracting archives.
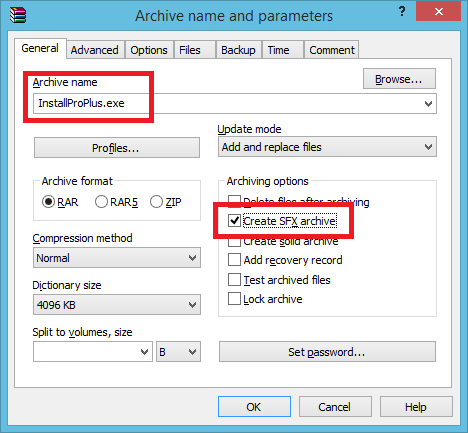
The archive needs to contain the files setup.exe, configuration.xml, and the Office folder including all
subfolders and files. On the WinRAR configuration screen, you need to tick the box Create SFX archive,
and provide an archive name for the installer.
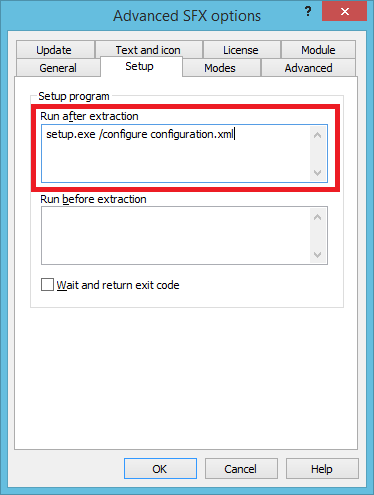
On the Advanced tab, you click the button to go to the SFX options.
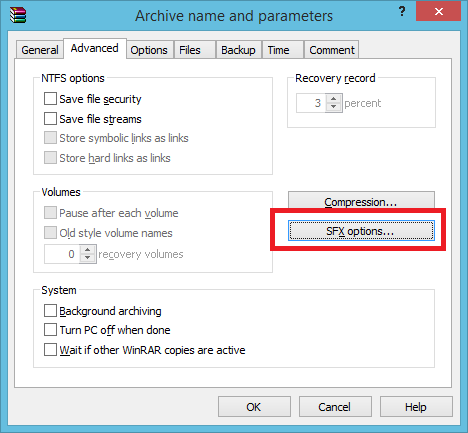
On the SFX options dialogue, you go to the Setup tab, and enter the following line into the textbox
Run after extraction.
setup.exe /configure configuration.xml
That was already everything. You can WinRAR let do its job, and create an SFX installer of your download. Starting the SFX installer will install your Office product either with or without user interface, according to your configuration.


